Updated the Grande Tambor page. I now have it documented up to his first competition.
Grande Tambor Update
Reply

Updated the Grande Tambor page. I now have it documented up to his first competition.
So far I’ve added a project page for my Bacon Alarm Clock and Grande Tambor.
The Grande Tambor page is far from finished. I have been working on that project since 2009, so there is a lot of stuff I can talk about. I’ll keep adding content to that page and make sure to let you know when I do.
layterz
If you know me at all, you know that I have trouble waking up in the morning. There is an episode of The Office where Michael burns his foot on a George Foreman grill because he makes bacon next to his bed in the morning so that he can wake up to the smell of bacon.
I always thought that this was an awesome idea and wanted to make my own version of it. So I did, and I’ll show you what I did.
Create a Bacon Alarm Clock. One that would allow me to set it up before I go to bed and then at a specified time in the morning, make bacon for me.
I went to Wal-Mart to look for a suitable grill for this and came across this George Foreman grill. http://www.georgeforemancooking.com/products/classic-plate-grills/gr0038w-champ-grill-white-grill-small-grill-grilling-healthy.aspx This is a 120 V, 760 Watt grill and will fit 4 half strips of bacon. Since W = V * A, the grill uses 6.33 amps of current.
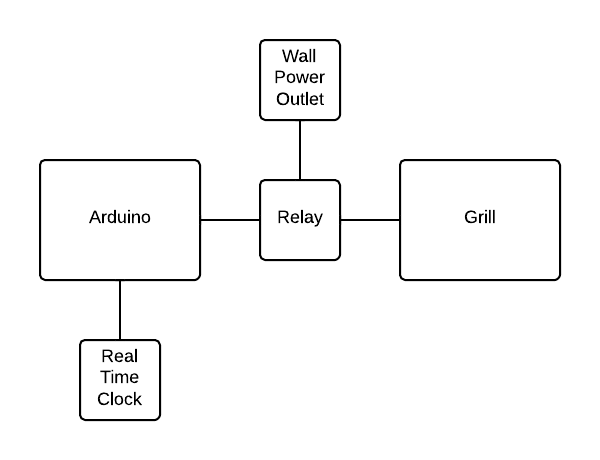
I needed a microcontroller to act as the brains to turn the grill on and off. Since I had recently purchased my first Arduino (an Arduino Uno), I decided to make this my first Arduino project. http://arduino.cc/en/Main/ArduinoBoardUno
Since the Arduino cannot supply nearly enough power to control the grill, it is necessary to have the Arduino control a relay that can handle the current for the grill. I was able to get my hands on two “Opto 22” 240 V, 5 amp solid state relays with 3-32 VDC control. Since the grill I am using draws 6.33 amps, I wired the relays in parallel to allow me to control up to 10 amps of power. However, now that I think about it, since I am in the USA, our power outlets run at 120 VAC, not 240 VAC. I wonder if running these relays at a lower voltage would give them a higher amperage rating…probably not, but just a thought.
I didn’t want to manually set the time on the Arduino each time that I turned it on. Fort this, I decided to also use a Real Time Clock(RTC) Module in the design. This module is able to keep track of time even if the power to the Arduino is cut because it has it’s own button cell battery power source. The Arduino can automatically get the time from the RTC. https://www.sparkfun.com/products/99
The code right now does not automatically detect daylight savings time. That shouldn’t really be too hard to implement. (I was just too lazy to figure out the algorithm)
Right now, in order to change the time and duration of the alarm, you have to go in and change the source code, recompile, and reload the Arduino. It would be nice to have a small LCD screen with some buttons that could display the current time and be able to set the alarm clock.
Here is the code for the Arduino. I’ll leave it to you to look up the libraries that I used.
/*
 * BaconAlarm.ino
 * Author: Jeremy Butler
 *
 * This code allows allows you to set a time to turn on one of the I/O pins
 * of the Arduino. You can also control the duration that pins should stay on.
 */

#include <Time.h>
#include <TimeAlarms.h>
#include <Wire.h>
#include <DS1307RTC.h>  // a basic DS1307 library that returns time as a time_t

#define ALARM_HOUR 7      //Hour of the alarm
#define ALARM_MINUTE 55   //Minute of the alarm
#define COOK_TIME 300     //How long to cook the bacon in seconds
#define ALARM_PIN 13      //The pin that will control the grill relay.

const static time_t DST = -21600; //-7(-6 in summer)*60*60

time_t sync(){
  return RTC.get() + DST;
}

void setup()  {
  Serial.begin(9600);
  setSyncProvider(sync);   // the function to get the time from the RTC
  if(timeStatus()!= timeSet)
     Serial.println("Unable to sync with the RTC");
  else
     Serial.println("RTC has set the system time");

  Alarm.alarmRepeat(ALARM_HOUR,ALARM_MINUTE,0,makeBacon); //Adjust this line to the time that you want to make your bacon
  Serial.println("Alarm Set");
  pinMode(13, OUTPUT);
}

void loop()
{
  if(Serial.available())
  {
     time_t t = processSyncMessage();
     if(t >0)
     {
        RTC.set(t);   // set the RTC and the system time to the received value
        setTime(t);
     }
  }
   digitalClockDisplay();
   Alarm.delay(1000);
}

void digitalClockDisplay(){
  // digital clock display of the time
  Serial.print(hour());
  printDigits(minute());
  printDigits(second());
  Serial.print(" ");
  Serial.print(day());
  Serial.print(" ");
  Serial.print(month());
  Serial.print(" ");
  Serial.print(year());
  Serial.println();
}

void printDigits(int digits){
  // utility function for digital clock display: prints preceding colon and leading 0
  Serial.print(":");
  if(digits < 10)
    Serial.print('0');
  Serial.print(digits);
}

/*  code to process time sync messages from the serial port   */
#define TIME_MSG_LEN  11   // time sync to PC is HEADER followed by unix time_t as ten ascii digits
#define TIME_HEADER  'T'   // Header tag for serial time sync message

time_t processSyncMessage() {
  // return the time if a valid sync message is received on the serial port.
  while(Serial.available() >=  TIME_MSG_LEN ){  // time message consists of a header and ten ascii digits
    char c = Serial.read() ;
    Serial.print(c);
    if( c == TIME_HEADER ) {
      time_t pctime = 0;
      for(int i=0; i < TIME_MSG_LEN -1; i++){
        c = Serial.read();
        if( c >= '0' && c <= '9'){
          pctime = (10 * pctime) + (c - '0') ; // convert digits to a number
        }
      }
      return pctime;
    }
  }
  return 0;
}

void makeBacon(){
  Serial.println("Making Bacon! Nom Nom Nom");
  digitalWrite(ALARM_PIN,HIGH);
  Alarm.timerOnce(COOK_TIME, stopMakingBacon);
}

void stopMakingBacon(){
  Serial.println("Your bacon is done! Woot!!!!");
  digitalWrite(ALARM_PIN,LOW);
}
Disclaimer: This post is going to probably be a little bit of a ramble, but oh well 😛
So graduation is coming up in 12 days with my bachelors in Computer Engineering from BYU. It has been very hard for me to comprehend that it is finally over and it still hasn’t completely sunk in. School has been all that I have known for my whole life. I guess it isn’t COMPLETELY over. I do plan on going back to grad school in about a year to get my masters in robotics. But still 😛
Now comes the time for me to start my career. I have been thinking about the kind of entry level job that I would like to have. I really want to work with robots, so I am hoping that I could land either an internship or entry level job at a prestigious robotics company that would let me stay there for a little while and then go back to grad school to get my masters and then come back to the work place with a better job. Some of these would include:
If that doesn’t work out, I’ll probably have to look for a job with a smaller local business. If I could find something close to Provo, that might be nice so I wouldn’t have to worry too much about moving. I mean, it doesn’t necessarily have to be close to Provo, I’d be willing to travel just about anywhere. I enjoy the adventure 😀
So I guess if any of my followers know of some robotics companies that might be offering entry level positions, it would be greatly appreciated if you let me know in the comments.
-Jeremy

I recently purchased the CM Storm Inferno Gaming Mouse after I lost my Logitech G400 on an airplane. I wanted to give a comparison of the two.
I mostly use these mice to play League of Legends. The G400 used an optical sensor. The Inferno uses a laser sensor. To be honest, I haven’t been able to tell any difference in the tracking. Both of them track great and I never got any skipping on any surfaces that I tried it on.
The Inferno is about $10 more, but there are some cool features that make it well worth the extra bucks. The Inferno has 11 buttons: 9 of them programmable, 1 of them to cycle through one of the 4 profiles, and 1 of them that allows for up to 8 additional combo executions per profile. The button combos can be programmed with the included software. The cool thing is, that these profiles are stored on the hardware of the mouse itself. Therefore, you can use these profiles on any computer without having to have special software on that computer for it to work correctly (Like my old G400). This is particularly helpful for gaming mice because it allows you to take your mouse with you to LAN parties or tournaments and not have to worry about getting your settings right for your mouse on the new computer.
-Jeremy
Well it has been a long time coming, but I am finally making a blog. I don’t claim to be the best at blogging or anything. I just thought that it would be good to have a place where I can keep track of my projects, share my ideas, give some tips and tricks, etc.
