
Grande Tambor is my 3 pound combat robot that uses a large vertical spinning aluminum drum as a kinetic energy weapon. I got the idea for this robot one day when I found an aluminum cylinder in my father’s basement. It looked like it had come off of some sort of conveyor system. I looked at it and thought to myself, “I can use this as the weapon on a larger version of my Dad’s 1 pound robot, Poco Tambor.” And so the project began.
Version 1.0

Once I knew what I wanted to use for my weapon, it was time to figure out how I was going to get it spinning. I knew that I wanted to use a similar method that my Dad’s 1 pound robot used. That robot had a brushless outrunner motor press fit directly into the weapon body. I wanted to do something like that.

I found these guys lying around from a previous project and thought I might give them a try. That was a brushless inrunner, which presented quite a few problems with mounting it inside of the drum.
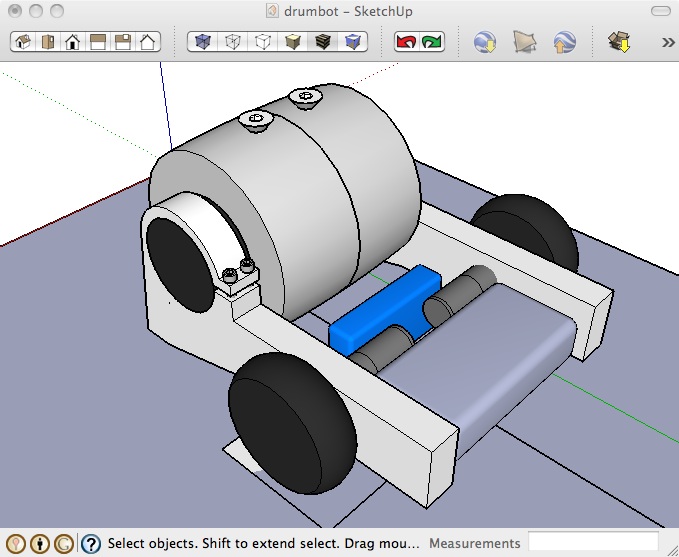

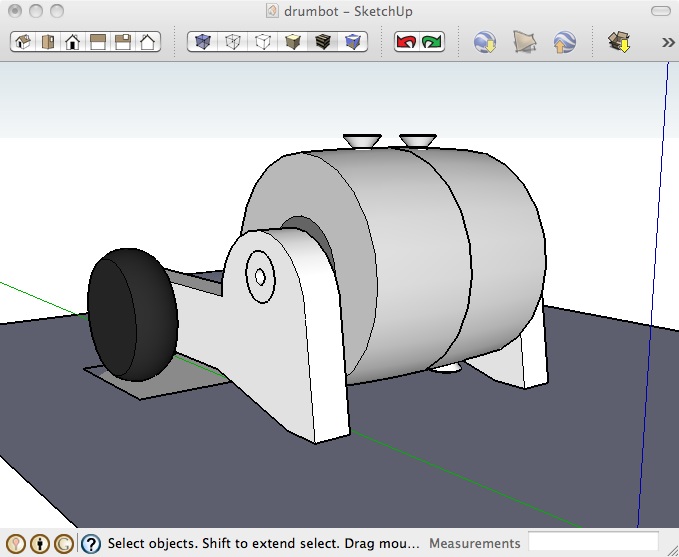

These pictures show my early designs for Grande Tambor that were made using Google Sketchup (Which, in my opinion, is one of the best 3D CAD programs for beginners). That last one in particular shows the inner workings of how the brushless inrunner would spin the drum. This weapon design ended up being trashed because it was too complicated and fragile.


I updated the weapon to use a brushless outrunner motor instead. Something that isn’t obvious in these pictures is that there isn’t a shaft that goes all the way through the drum. It is supported instead by the motor itself on one side and an aluminum insert on the other side. This will end up creating problems for me in the future.


So I got work on the weapon. Throwing it on the lathe to get the holes to be just the right size. This process took a lot of patience. First, I got the whole to be a little smaller than what I wanted. Then, I kept repeating the process of making the whole slightly bigger and testing the fit until it got to just where I wanted it. I had to be careful not to go too big or else the whole would be ruined. In other words, you can always take material away easily, but it is much harder to add material back once it is gone.
The armor pieces were made from a sheet of half inch marine plastic that I had lying around. I just printed out some templates and glued them to the material so that I could cut them out on the band saw and drill holes in them accurately. Turns out that this material isn’t very strong and led to my robot failing in one of it’s first fights.
This was the first test of the weapon system. It seemed to spin up fine, however, it vibrated quite a lot.


After some more thought, I decided that I wanted the robot to be invertible. So I designed the frame so that the robot would work even if it was upside down. Since most of the weight was in the front of the robot because of the weapon, I decided to move the wheels as close to the front as possible to give it better handling.
Also, at this point I had decided on the type of drive motors that I was going to use. I found some 13mm maxon motors on ebay. These motors were being used very successfully at the time in the antweight division. Since I had so much weight in my weapon, I had to really skimp on the drive motors; resorting to using antweight size drive motors. I can’t quite remember what type of drive speed controllers I was using, but it doesn’t really matter because I ended up burning them up and switching to Fingertech’s Tiny ESC’s.
Here is a video of a drive test with the new speed controllers. It looked like it was going to work pretty well, however this test was without the weapon mounted.

Ok, I was bad and didn’t take many pictures between these two points. Anyways, you can see that I changed the front part of the side braces to be a convex shape instead of the concave shape that I had previously. If I remember correctly, this was because the concave shape didn’t leave enough material for the shaft.
You can also tell in the picture that I have switched to a dead (meaning that it doesn’t rotate) weapon shaft that goes all the way through the drum. The previous design was just way too flimsy. The shaft of the outrunner motor was only like a 4mm diameter. Plus the fact that it didn’t have one shaft that went all the way through meant that it was extremely hard to balance correctly and any big hit would probably cause it to fail. The shaft I ended up using was a 10mm hollow steel shaft that I found on a printer. Since it was a larger diameter than the outrunner’s original shaft, I had to bore out the stator to the right size and remove the excess parts of the magnet case.
With all of that done, it was done and ready for it’s first fight!
Schiele Museum Clash of the Bots
Grande Tambor’s first event was the Shiele Museum Clash of the Bots. Here’s a copy of a forum post that I made after the event.
So Grande Tambor (That is its name for now) made it through his first competition at Clash of the Bots this past saturday. He did very well in my eyes. I know some people got some good videos of his fights too. If you have one, please share it with us.
Here’s a rundown of his matches:
1. Loss to Weta: God of Ugly Things. I got a couple good hits on his bot, however his superior maneuverability led to a wheel being torn off and bending the Maxon gearbox shaft. I was still able to move with one wheel, but then Weta ripped one of the carbon fiber coverings off and exposed the lipo, so I tapped out. Thankfully, Thomas was able to lend me another Maxon gearbox so I could keep competing.
2. Win to Mini Doom. I was able to tear off his horizontal spinning blade and get a good hit on him, at which point he stopped moving. So win by KO.
3. Loss to Cloud of Suspicion. I was able to get one good hit on him before I ended up running upside down with the weapon spinning the wrong direction. I ended up launching myself into the ceiling successfully breaking both of my wheel hubs and completely breaking one of the main support arms for my drum. I tapped out and couldn’t compete the rest of the day because i didn’t have any spare parts for the chassis.
Things I learned from this competition:
1. Use UHMW!!!
2. Move wheelbase even closer to front for better drivability.
3. Don’t spin the weapon so fast when I am upside down 😛
4. My weapon is completely capable of launching a robot into the ceiling and had no failures the entire time.
5. Protect the wheels.


Version 2.0
I learned so many things from my first competition with Grande Tambor. Now it was time to rebuild him better. So I got to work on designing a new chassis and looking for better parts.


Hi I’m building a weapons system similar to this, and I was wondering what did you use to fit the outrunner into the drum. Glue, screw, friction?
I used a rubber band that I found in an old printer that was just the right size to wrap around the can of the outrunner. I then put the can with the rubber band on a lathe and used sandpaper to turn it down so it would press fit into the drum. It seems to work pretty well. Has a little bit of slippage on big hits so that it doesn’t transfer as much energy back into the magnets. I keep saying that one day I’ll put a video up of the weapon system, but I also keep being lazy 😛 Although I do have a video that might be of help. https://www.youtube.com/watch?v=I0-pwfL5I-U Also, I hope you aren’t planning on just using a stock outrunner to do this on a beetle. I had to hack mine up in order to put a 3/8″ titanium shaft through it.